A DOL (Direct-On-Line) starter is one of the most common and cost-effective devices used to control and protect low-power motors in industrial and commercial applications. The DOL starters are relatively simple compared to advanced starting methods like star-delta or soft starters. They still require regular and systematic maintenance for reliable operation and longevity.
Many electrical technicians and plant maintenance teams overlook the importance of proper DOL starter maintenance after the each motor run. This negligence can lead to unexpected failures, safety hazards, and costly downtime.
What is a DOL Starter?
A DOL starter is an electromagnetic device that directly connects a motor to the power supply at full voltage, allowing the motor to develop full torque immediately. It consists of three main protective components:
- Circuit Breaker or MCCB – Protects against short circuits and provides disconnection
- Main Contactor – Switches the motor on and off electromagnetically
- Thermal Overload Relay – Protects the motor from overheating due to excessive current
The simplicity of the DOL starter design makes it ideal for motors below 5 HP.
Why Regular Maintenance of DOL Starters Matters
Preventive maintenance of DOL starters offers multiple benefits:
- Increased Equipment Lifespan: Regular maintenance can extend the operational life of your DOL starter by several years, reducing the need for expensive replacements.
- Reduced Downtime: By identifying and fixing minor issues before they become major problems, you avoid unexpected motor shutdowns that disrupt production.
- Lack of maintenance may cause loose connections in cable joints, absorption of dust, dirt in the contacts, sulphation in the connecting joints, insulation damage, etc.
- Safety Assurance: Faulty starters can cause electrical shocks, fires, or motor failures. Regular maintenance ensures safe operation for workers and equipment.
- Cost Savings: Preventive maintenance is significantly cheaper than emergency repairs or complete equipment replacement.
- Optimal Performance: A well-maintained DOL starter ensures your motor operates at peak efficiency.
In my plant, I always make sure to do maintenance of starters at least once a week or after continuously running the motors for 3-5 days. This helps me keep the starters healthy and ready for taking in line whenever necessary.
Essential Precautions Before Maintenance Activities
Before you begin any maintenance work on your DOL starter, follow these critical safety guidelines:
1. Lockout and Tagout (LOTO) Procedure
Always isolate the power source before starting maintenance work. This is non-negotiable. Use a lockout device to physically lock the circuit breaker or switch in the OFF position, and attach a warning tag explaining that maintenance is in progress.
2. Personal Protective Equipment (PPE)
Wear appropriate PPE including:
- Safety glasses or face shield
- Insulated gloves (rated for the system voltage)
- Safety shoes with non-conductive soles
- Hard hat (if working in industrial settings)
3. Use Insulated Tools
Never use metal tools directly on electrical components. Always use insulated or non-conductive tools to prevent accidental shorts or electrical shocks.
4. Verify De-Energization
Even after switching off and locking out, verify that the equipment is de-energized using a multimeter or non-contact voltage tester. Never assume the supply is off, always verify.
Components of DOL Starters and Their Maintenance
1. Circuit Breaker (MCCB – Molded Case Circuit Breaker)
- Visual Inspection: Check for signs of burning, discoloration, or physical damage
- Connection Check: Ensure all input and output terminals are tight and show no signs of corrosion
- Dirt Removal: Clean away dust and debris using dry compressed air
- Contact Inspection: If accessible, look for burnt or pitted contacts
- Trip Test: Periodically test the breaker’s trip function (do this on a no-load condition)
Example: After 3 months of operation in an industrial setting, you notice the MCCB terminals showing slight corrosion. Clean the terminals with a dry cloth and apply a light coating of electrical grease to prevent further oxidation.
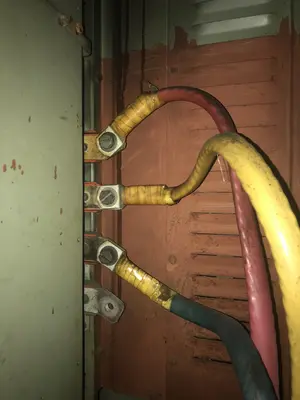
2. Main Contactor
The main contactor consists of movable contacts (called armature) and stationary contacts, along with a magnetic coil that creates the operating force.

Maintenance Tasks:
- Contact Inspection: Visually examine the main contacts (L1, L2, L3) for pitting, burning, or carbon buildup
- Contact Cleaning: If contacts show minor pitting or discoloration, clean them carefully using:
- A pencil eraser for light corrosion
- Fine emery paper (220-400 grit) for moderate oxidation
- Specialized electrical contact cleaner for stubborn contamination
- Mechanical Function Test: Manually operate the contactor (with power off) to check for smooth, free movement
- Coil Resistance Measurement: Using a multimeter set to ohms, measure the coil resistance and compare with manufacturer specifications
- Coil Cleanliness: Ensure the magnetic coil is free from dust and debris
3. Thermal Overload Relay (OLR)
Maintenance Tasks:
- Setting Verification: Check that the relay is set to trip at 100% of the motor’s full-load current (FLC)
- Calculation Example: For a motor rated 5 HP at 415V, 3-phase with 80% efficiency:
- Full Load Current = (5 × 746) / (415 × √3 × 0.80 × 0.85 PF) ≈ 6 Amps
- OLR Setting = 100% × 6 = 6 Amps
- Calculation Example: For a motor rated 5 HP at 415V, 3-phase with 80% efficiency:
- Cleanliness Check: Remove dust and debris from the relay body
- Trip Function Test: Test the thermal overload relay’s trip function quarterly to ensure it operates correctly
- How to Test: Press the manual trip button (if equipped) to verify the motor stops
- Alternative Method: Gradually increase the load until the relay trips (only in controlled conditions)
- Bimetallic Element Inspection: Look for any cracks or distortion in the bimetallic strip
The OLR must be carefully selected to allow the high starting current of the motor (typically 5-7 times the full-load current) while still protecting against sustained overloads. Never set the OLR too low, as it will trip unnecessarily during normal starting.
Step-by-Step DOL Starter Maintenance Procedures
Monthly Maintenance Checklist
Perform these checks every month or every 160-170 operating hours:
1. Visual Inspection
- Walk around the DOL starter panel and look for any visible signs of:
- Burning or scorching marks
- Loose wires or terminals
- Rust or corrosion on metal parts
- Unusual discoloration
- Cracks in the plastic enclosure
2. Dust and Debris Removal
- Use compressed air (at pressure ≤30 psi) to blow away dust from:
- Cooling vents and fins
- Component surfaces
- The panel’s interior
- For stubborn dirt, use a soft brush with compressed air
3. Connection Tightness Check

- Using an appropriately sized wrench or Allen key, check the tightness of:
- All input terminals (from the main supply)
- All output terminals (to the motor)
- Contactor terminals (L1, L2, L3, T1, T2, T3)
- Control circuit connections
- Do not over-tighten, as this can damage terminals
4. Operation Test
- If safe to do so, perform a normal start-stop cycle
- Listen for any unusual noises (clicking, humming, or grinding)
- Feel the temperature of the contactor coil (should be warm, not hot)
- Verify the motor starts smoothly without jerking
Quarterly Maintenance Checklist
Perform these checks every 3 months or every 500 operating hours:
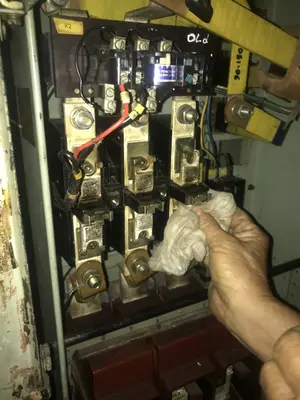
1. Detailed Contact Inspection and Cleaning
- Shut down power and follow LOTO procedures
- Remove the contactor if possible
- Inspect the main contacts (L and T contacts) under a lamp or with a flashlight:
- Minor pitting (small surface marks) is acceptable
- Heavy pitting, welding, or severe burning requires replacement
- If contacts need cleaning:
- Use emery paper for light cleaning (gently rub the contact surface)
- Use a specialized contact cleaner for best results
- Allow the cleaner to dry completely before reassembly
- Do not use harsh solvents that can damage the contact material
If your DOL starter shows slight carbon buildup on the auxiliary contacts after 3 months of operation in a dusty environment. You carefully apply electrical contact cleaner using a small brush, allowing it to dissolve the carbon. After drying, the contacts shine again, and the holding function becomes more reliable.
2. Overload Relay Functional Test
- With the system de-energized and under controlled conditions:
- Press the manual trip button to verify the relay trips and the contactor releases
- Manually reset the relay and verify it re-engages
- If the relay doesn’t trip when tested, it may need recalibration or replacement
3. Control Circuit Testing
- Check the start button for smooth pressing and clean contacts
- Check the stop button for immediate response
- Verify the auxiliary holding contact operates correctly:
- Press start, then quickly release
- The motor should continue running (holding function)
- Pressing stop should immediately de-energize the circuit
- Test indicator lamps (if present) for proper lighting during motor run
4. Lubrication of Moving Parts
- Identify all moving parts in the contactor:
- The armature (moving part of the main contactor)
- The mechanical interlock mechanism (if present)
- Pivot points of the auxiliary contacts
- Apply a small amount of light machine oil or specified lubricant to:
- Pivot points
- Sliding surfaces
- Important: Do not over-lubricate. Excess oil attracts dust and dirt, which degrades performance
- Wipe away excess lubricant with a clean cloth
Half-Yearly Maintenance Checklist
Perform these checks every 6 months or every 1000 operating hours:
1. Insulation Resistance Measurement
- Using a megohmmeter (insulation tester), measure the insulation resistance between:
- Main terminals (L1, L2, L3) and ground/earth
- Control circuit terminals and ground
- Between phase terminals
- Acceptable Values:
- Minimum: 1 MΩ (megohm) at room temperature
- For critical applications: Aim for 10-50 MΩ
- Low Resistance Indication: If readings fall below 1 MΩ, moisture has entered the equipment. Dry out the starter in a warm, dry environment or use a heat gun (carefully) before retesting
2. Electrical Continuity Test
- Set a multimeter to the continuity function
- Test the main contacts (L1-T1, L2-T2, L3-T3) when energized to verify:
- Proper electrical path with minimal voltage drop
- All three phases carry equal current when measured with a clamp meter
3. Earth Connection Verification
- Verify that the earth/ground wire is securely connected to the panel body
- Measure continuity between the earth terminal and the panel frame (should show near-zero resistance)
- Check for any corrosion at the earth connection point and clean if necessary
4. Component Condition Assessment
- Visually inspect the circuit breaker for wear
- Check for any signs of arc damage inside the contactor
- Inspect the thermal overload relay bimetallic element for:
- Cracks or deformation
- Proper positioning within the housing
- Replace any component showing visible damage
Yearly Maintenance Checklist
Perform these checks annually or every 2000 operating hours:
1. Electrical Testing
- Perform the following tests:
- Contact resistance measurement (voltage drop across contacts)
- Coil resistance verification
- Control circuit voltage measurement
- Thermal imaging to detect hot spots
- Insulation testing
2. Component Replacement Assessment
- Evaluate each component’s condition:
- Contactor: Typically lasts 5-7 years with proper maintenance
- Overload Relay: Usually lasts 3-5 years depending on trip frequency
- MCCB: Typically lasts 10+ years
- Replace components showing wear or damage
3. Documentation and Records
- Update your maintenance log with:
- All test results
- Any repairs or component replacements
- Observed issues or anomalies
- Next scheduled maintenance date
- This documentation helps identify patterns and predict future failures
4. Complete Panel Cleaning
- Remove all loose dust and dirt using compressed air
- Clean exposed surfaces with a clean, dry cloth
- Check all fasteners and tighten any loose bolts
- Inspect cable routing for any damage or deterioration
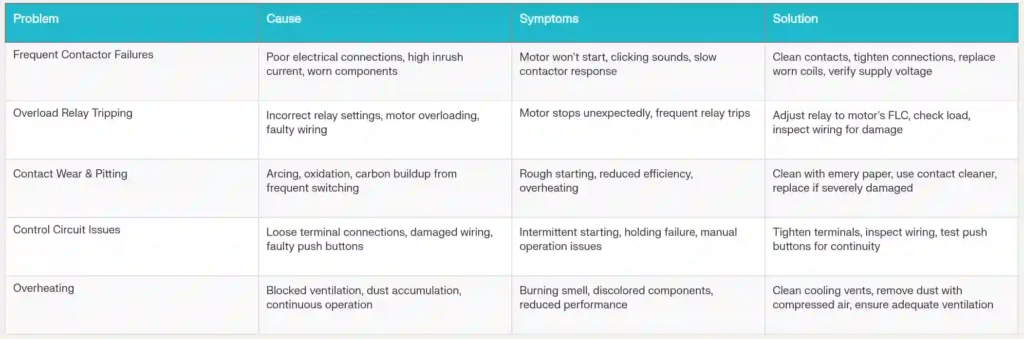
Common DOL Starter Issues and Troubleshooting
Even with proper maintenance, DOL starters can develop issues. Here’s how to identify and resolve them:
Issue 1: Motor Fails to Start
Possible Causes:
- No power supply reaching the starter
- Blown fuse or tripped circuit breaker
- Broken control circuit wiring
- Non-functional start button
- Faulty contactor coil
Diagnostic Steps:
- Check if the circuit breaker is tripped; if so, reset it and check for overload
- Verify power supply using a multimeter (should measure rated supply voltage)
- Press the start button and listen for the contactor clicking sound
- If no clicking occurs, test the start button for continuity
- Measure the coil voltage with a multimeter when the start button is pressed
Solution:
- If coil voltage is present but contactor doesn’t engage, the coil is faulty and needs replacement
- If no voltage reaches the coil, trace the control circuit for broken wires or loose connections
- Replace the start button if it shows no continuity
Issue 2: Contactor Chatters or Vibrates Excessively
Possible Causes:
- Low coil voltage (brownout condition)
- Worn or damaged contactor pole face
- Dirt or debris on pole face
- Loose mechanical connections
Diagnostic Steps:
- Measure the coil voltage while the motor is running (should match the rated coil voltage ±10%)
- Visually inspect the pole face for dirt or damage
- Check all mechanical mounting bolts for tightness
- Listen to determine if chattering occurs during normal operation or just at start
Solution:
- If voltage is low, investigate the power supply for brownout conditions
- Clean the pole face of the contactor using fine emery paper or contact cleaner
- Tighten all mechanical connections
- If the pole face is damaged, replace the contactor
Issue 3: Overload Relay Trips Frequently
Possible Causes:
- Motor is overloaded beyond its rated capacity
- Relay is set too low (below the motor’s full-load current)
- Motor bearing failure (high friction requiring more current)
- Incorrect or unbalanced phase voltage
Diagnostic Steps:
- Measure the current on each phase using a clamp meter
- Acceptable: All three phases within 5% of each other and at or below full-load rating
- Problem: Any phase significantly higher or currents exceeding rated FLC
- Check the relay setting against the motor’s nameplate full-load current
- Measure the three-phase voltages
- Acceptable: Within ±10% of rated voltage with less than 2% phase imbalance
- Problem: Significant voltage imbalance or brownout condition
- Check the motor for unusual noise, vibration, or heat (bearing issue indicator)
Solution:
- Reduce the motor load to within rated capacity
- Adjust the overload relay setting to match the motor’s actual full-load current
- Have the motor bearings inspected or replaced if necessary
- Contact the power utility if voltage problems are detected
Issue 4: Weak Starting or Slow Contactor Response
Possible Causes:
- Worn contactor contacts with high resistance
- Dirty pole face reducing magnetic pull
- Loose mechanical connections
- Corrosion on terminal connections
Diagnostic Steps:
- Measure the voltage drop across the main contacts when the motor is running using a multimeter:
- Connect leads across one pair of contacts (e.g., L1 to T1)
- Normal drop: Less than 0.5V
- High drop: More than 1.5V indicates contact wear
- Visually inspect the pole face for carbon or debris
- Check all connection points for corrosion or looseness
- Measure the time from pressing START to the motor reaching full speed
Solution:
- If voltage drop is excessive, clean the contacts with emery paper and contact cleaner
- If drop remains high after cleaning, replace the contactor
- Clean the pole face using a soft brush and compressed air
- Tighten all loose connections
- Remove corrosion from terminals using a small wire brush and light electrical grease
Conclusion
Regular, systematic maintenance of your DOL starter is not just about preventing breakdowns—it’s an investment in the reliability, safety, and efficiency of your electrical system. By following the maintenance schedules and procedures outlined in this guide, you can ensure your DOL starter provides years of dependable service.
The key to successful DOL starter maintenance is consistency. Establish a regular maintenance routine, keep detailed records, use appropriate tools and techniques, and don’t hesitate to seek professional help when needed. With proper care, your DOL starter will reliably control your motors for many years to come.
Remember: A few minutes of preventive maintenance today can save hours of troubleshooting and expensive downtime tomorrow.